구성 요소가 처음 렌더링될 때 DOM 모으다
컴포넌트가 DOM을 떠날 때, 풀다
라이프사이클을 왜 알아야 할까요?
최근에는 함수 컴포넌트가 많이 사용되지만 React 초기에는 클래스 컴포넌트가 널리 사용되었습니다.
클래스 구성 요소는 기본적으로 수명 주기에 따라 메서드를 제어할 수 있습니다.
hook() 함수를 별도로 사용하여 컴포넌트의 조립 및 분해 시간에 따라 기능성 컴포넌트를 제어할 수 있습니다. 클래스 구성 요소를 이해하려면 수명 주기를 알아야 합니다.
그렇다면 함수 컴포넌트와 클래스 컴포넌트를 먼저 비교해보자.
export default function Clock(){
   const (date, setDate) = useState(new Date());

   return(
     <>
       <h1>Hello!</h1>
       <h2>{date.toLocaleTimeString()}</h2>
     </>
   )
}
export default class Clock extends React.Component {
constructor(props){
super(props);
this.state = {date:new Date()};
}
render(){
return (
<>
<h1>Hello!</h1>
<h2>{this.state.date.toLocaleString()}</h2>
</>
)
}
}과거에 펑션 블록으로 이것을 다루었기 때문에 익숙하지 않을 것입니다.
위에 현재 건설자디자이너로서 초기화를 담당하는 영역오전.
이 부분에서는 해당 시계 구성 요소에서 사용할 상태를 정의할 수 있습니다.
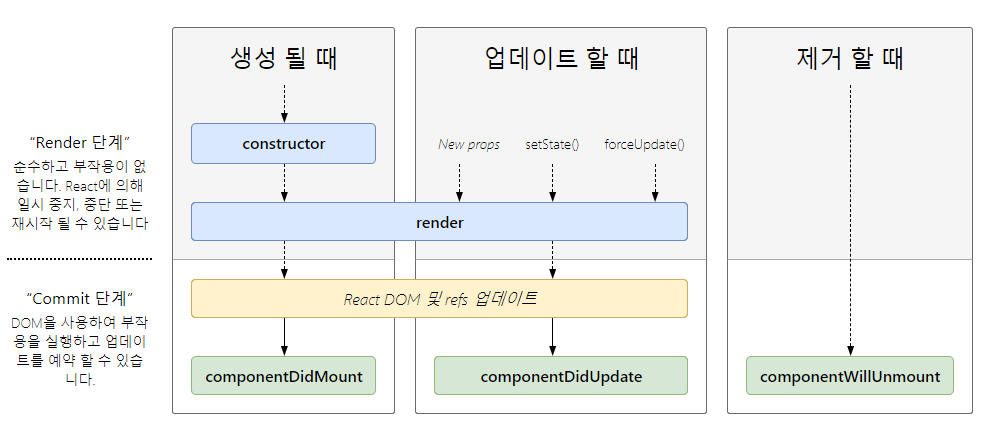
바로 아래, 만들다()~이다 초기 렌더링일부가 되기 위해
생성자 아래에 다음을 추가해 보겠습니다.
tick() {
  this.setState({
    date : new Date(),
  });
}

componentDidMount(){
  console.log("componentDidMount!");
  this.timerID = setInterval(()=>this.tick(), 1000);
}
componentDidMount() 부분은 ReactDom이 업데이트된 직후이것이 계속되는 방법입니다. “componentDidMount!”가 콘솔 창에 한 번만 나타나는 것을 볼 수 있습니다. 즉, 한 번만 발생합니다!
1초 후에 틱 기능이 실행되도록 하는 방식입니다. 이때 틱 기능은 setState가 있으면 1초 후에 변경된 상태로 다시 렌더링됩니다. (위 그림 참조)
마찬가지로 componentDidMount() 아래에 다음 코드를 추가해 보겠습니다.
componentDidUpdate(){
   console.log("componentDidUpdate!");
   console.log(this.state.date);
}

componentWillUnmount(){
   console.log("componentWillUnmount!");
   clearInterval(this.timerID);
}
구성 요소가 업데이트될 때마다 componentDidUpdate() 방법이 실행됩니다
구성 요소가 제거되면, componentWillUnmount() 방법이 실행됩니다.